 Skip to content
Knowing how to install cabinets is one of the most valuable DIY skills a homeowner can have. Whether you’re upgrading your kitchen, bathroom, or storage space, installing cabinets yourself can save you $1,000 or more in labor costs — and the results are instantly impactful. At Arden Cabinet Manufacturing, we install custom cabinets across Sacramento every week, and in this guide we’re sharing the exact six-step process our professional installers use in the field.
With the right tools, a bit of patience, and a solid plan, learning how to install cabinets is a project most homeowners can tackle confidently. We’ve also included a full video walkthrough at the end so you can follow along visually at every step.
Tools and Materials You’ll Need
Before you learn how to install cabinets, gather everything you need so you’re not scrambling mid-project:
- Tape measure and pencil
- 2–4 ft level
- Stud finder — a quality model like those from Stanley or Zircon will save a lot of frustration
- Power drill and bits
- Screwdriver (manual or electric)
- Hole saw (for plumbing cutouts)
- Oscillating multi-tool (for trims and notching)
- Wood shims
- Clamps
- Cabinet screws
Lay everything out beforehand so the install flows smoothly from step to step.
Step 1: Mark Your Layout

The first step in how to install cabinets is setting your layout — and it sets the tone for everything else. Skipping or rushing this step is the number one cause of crooked, uneven installs.
Here’s what to do:
- Draw a level horizontal line on the wall for the tops and bottoms of your wall and base cabinets
- Use your stud finder to locate and mark all stud positions along the wall
- Double-check for uneven floors or walls — they’re more common than you’d expect, especially in older Sacramento homes
Walls are rarely perfectly flat. Take the time to level and mark everything carefully before moving on. In neighborhoods like East Sac, Land Park, and the Fab 40s, plaster walls and settled foundations mean extra attention here pays off significantly.
Step 2: Prep Your Cabinets

Before lifting anything into place, prep your cabinets properly:
- Remove all doors, drawers, and hardware
- Label everything clearly and set it aside safely
- If there’s plumbing or electrical in the way, use a hole saw or oscillating multi-tool to cut out the necessary back panel sections
- Double-check overlay measurements before cutting anything
This step lightens the cabinets significantly, making them easier to maneuver and preventing damage to doors and hardware during handling. It’s a small step that makes a big difference in how smoothly the rest of the install goes.
Step 3: Set the Base Cabinets in Place
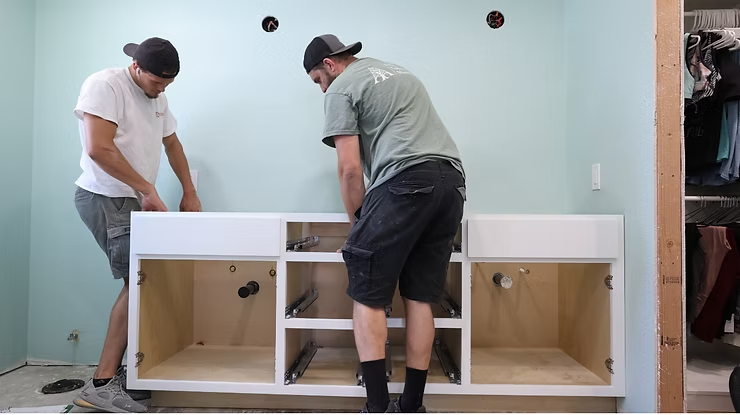
With your layout marked and cabinets prepped, it’s time to start positioning. Here’s how to install cabinets at the base level:
- Place each cabinet according to your wall layout marks
- Use your level to check side to side, front to back, and corner to corner
- Shim under the base as needed to make everything perfectly level
- Once level, drill through the back rail into studs to secure each cabinet to the wall
Even a 1/8″ slope at this stage can cause serious problems when it’s time to install countertops. Take your time and don’t move on until every base cabinet is perfectly level.
In most professional installs we do wall cabinets first to avoid leaning over the base units. On this particular job we started with base cabinets while waiting on countertop delivery — either order works depending on your project timeline.
Step 4: Connect Cabinets Together

When installing multiple cabinets, seamless alignment between units is what separates a professional-looking install from a DIY one. Here’s how to install cabinets so they connect cleanly:
- Clamp adjoining cabinets together at the face frames
- Drill pilot holes through one frame into the next
- Use cabinet screws to fasten the units together securely
- Run a long level across the front faces to check for any dips or high spots
- Shim behind as needed to align everything flush with the wall
No gaps, no uneven seams — this is where your install starts looking like it was done by a professional. See examples of seamless cabinet installs in our custom kitchen portfolio.
Step 5: Install the Wall Cabinets

Wall cabinets can be heavy and awkward, so have a helper ready or use a temporary ledger board screwed to the wall at the cabinet bottom line to support the weight while you fasten.
- Mark the bottom line for your wall cabinets on the wall
- With help, lift and align each cabinet to your marks
- Drive screws into the marked studs through the back rail
- Repeat for adjacent cabinets
- Clamp and fasten adjoining wall cabinets together just as you did with the base units
- Shim where needed for consistent face alignment across all units
Be careful not to overtighten screws — stripping them in drywall or wood means losing holding power and creating more work to fix. This step is also relevant whether you’re installing kitchen cabinets or bathroom vanities — the same principles apply.
Step 6: Reattach Doors and Make Final Adjustments

The final step in how to install cabinets is also the most satisfying — putting the finishing touches on your work:
- Reattach all doors and drawers
- Adjust hinges to align doors vertically and horizontally
- Check that all drawers slide smoothly without rubbing
- Make minor tweaks to hardware, knobs, and alignment as needed
Stand back and look at the full install from a distance. Everything should feel solid, straight, and smooth. If a door is slightly off, most modern hinges have built-in adjustment screws that let you dial in the position without removing anything — check out our guide on how to fix a broken cabinet door for a detailed walkthrough on hinge adjustments.
DIY Cabinet Install: Pros and Cons
Before deciding whether to DIY or hire a professional, here’s an honest breakdown:
Pros
- Saves $1,000 or more on labor costs
- You control the pace and can make design tweaks as you go
- Builds a lifelong skill and confidence for future projects
Cons
- Takes time, especially if you’re new to tools or carpentry
- Precision matters — small errors affect the final look significantly
- Wall cabinets especially require two people for safe handling
- Specialized tools like a hole saw, level, and clamps are required
For straightforward layouts in newer homes, DIY is very achievable. For complex layouts, historic homes with uneven walls, or high-end custom cabinet installations with tight reveals and premium finishes, professional installation is worth the investment.
Ready to Start Your Cabinet Project?
Now that you know how to install cabinets step by step, you’re ready to tackle your project with confidence. If you’d rather leave it to the professionals or want help with the design and material selection before you start, contact Arden Cabinet Manufacturing for a free consultation. We design, build, and install custom cabinets across Sacramento, Roseville, Folsom, El Dorado Hills, and surrounding Northern California communities.
Watch our complete step-by-step cabinet installation video below for a full visual walkthrough of the process.
